EOS BEGINNERS: Account Security Best Practices

This a best practices guide so that EOS coin holders can secure their funds.
Please note, this guide is aimed at those that wish to protect their own EOS assets, and therefore, these tips are not applicable to those that hold their EOS on an exchange. By definition, if your EOS is held on an exchange you do not own any EOS, you only have an IOU from an exchange and are vulnerable to fees, overarching regulations, and hacks. For a guide on how to move your EOS off an exchange and into a secure wallet, please read this article by EOS New York.
If you are new to EOS and would like to learn about your EOS account in general, please read our article EOS Beginners: Anatomy of an EOS Account.
If you are someone that is pretty technologically savy, and do not need your hand held, consider this article by Ben Sigman of ShEOS, How to Setup A Secure EOS Account.
This article will cover the following topics. Please navigate with regard to your experience level and need.
WHY SHOULD YOU SECURE YOUR ACCOUNT
HOW TO SECURE YOUR ACCOUNT KEYS
SCATTER
HOW TO STAKE YOUR EOS
HOW TO SET UP AN ACCOUNT ALERT
HOW TO SET UP A MULTI-SIG ACCOUNT
HOW TO SET UP PERSONALIZED PERMISSIONS
HOW TO CHANGE COMPROMISED KEY PAIRS
WHY SHOULD YOU SECURE YOUR ACCOUNT
Theft. Scams. Phishing. For those in the crypto world, there is no bigger threat to your holdings than a possible thief. While traditional blockchains such as Bitcoin offer very few tools for coin holders to protect their accounts, EOS accounts are desgined with safety in mind.
These are early days in the crypto currency world, and thus there are limited third parties that coin holders can delegate the safety of their accounts to. Thus, it is in the best interest of all coin holders to educate themselves and secure their accounts. If a thief steals your funds because you failed to secure your account, you will have virtually no recourse to get the funds back.
HOW TO SECURE YOUR ACCOUNT KEYS
The first rule of owning cryto is to NEVER share your private keys with anyone. Not your spouse, not your best friend, not even your dog. Your private key is yours, and yours alone, and anytime you share it, you risk your account getting hacked. This means that anytime you are asked by a website, email, or any account for your private key, youo should treat the request with extreme skeptism. These could be phising accounts. Do your research before trusting ANY entity with your private key.
Now that you are officially paranoid, let's move on to EOS wallets.
Wallets are the most secure way to store your EOS account. Your EOS account can only be accessed via your EOS account keys, and these keys should be stored in a wallet.
There are three types of wallets: hardware wallets, software wallets and paper wallets.
Hardware wallets are the safest means for storing your keys. You purchase a physical device which generates and holds your key information for you. This protects your keys even if you are using an untrustworthy computer. The Ledger Nano S is one of the most used Hardware wallets.
Software wallets are based on computer software. Your keys will be stored locally on your device, allowing you to control your keys from you computer, laptop, phone, etc. However, if your computer gets hacked you risk losing your keys and consequently your funds. Scatter and Greymass are two Desktop wallets, while EOS Lynx and Meet.One are two mobile wallets.
Paper wallets are a printed QR code that contains your private key information. Paper wallets are considered one of the most secure options to store private keys as they are not connected to the internet and cannot be hacked. Another plus is that they are practically free as you can print them out on paper via a printer. However, it is still risky to import a private key into a compromised computer.
Here are some wallets we recommend:
Hardware Wallet:
Software Wallet:
Paper Wallet:
If you want to create a paper wallet, you can create the QR code from your private key on Scatter.
If you use a safe wallet to store your account keys, and you practice good safety practices, your EOS keys should be secure. But you don't want to just rely on wallets to secure your funds, you want to use all the tools available to you in the EOS ecosystem to ensure that your keys (and thus funds) are safe.
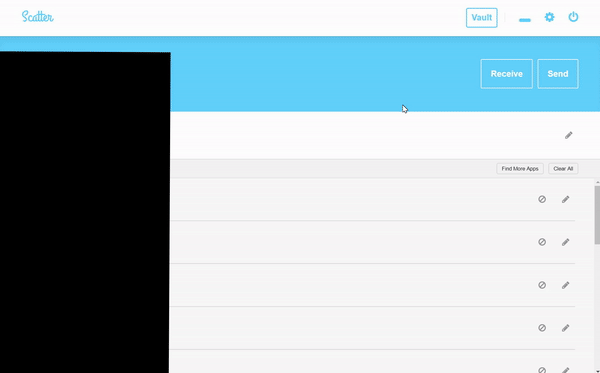
SCATTER
WHAT IS SCATTER? Scatter is a tool that allows users to connect and interact with the EOS blockchain (among others). If you are familiar with MEW, Scatter is like MEW, but better. It is important to know what Scatter is and understand how to use it as it will be a touchstone tool in this article going forward.
Once you set up Scatter, you will be able to sign transactions, protect your data, and interactive with apps, all without exposing your EOS keys.
You can download the latest version of Scatter here. Follow the download and set up instructions and come back to this article. If you want to learn more about Scatter before downloading Scatter, you can visit Scatter’s website here.
HOW TO STAKE YOUR EOS
An interesting aspect of the EOSIO software that governs the EOS mainnet is the ability to "stake" your funds. Whenever you stake your funds you are telling your system to not allow those funds to leave your wallet AT ALL. In fact the only way to move your EOS coins after they have been staked is to "unstake" them. This means that you go log into your wallet, and ask the system to "unstake" your frozen funds. After you have requested that your funds be unstaked, the system will take 72 hours to unstake your coins. In other words, you cannot move your funds for 72 hours after you have asked for your funds to become liquid.
While this may seem annoying, this unstaking period actually ensures that your funds are secure. If a thief were to hack into your account and try to move your funds, they would first have to unstake your coins, giving you 72 hours to see that they have been unstaked and rectify the situation.
You can stake and unstake your funds using your wallet of choice, but for our purposes we will use Scatter.
- Log in to Scatter using your Scatter password. NOTE this is not your EOS private key, but a password you chose to access Scatter when you set up your Scatter account.
- Click on Vault.
- Select the keypair for the account you want to stake.
- Click on your EOSIO Account name.
- Select the amount of EOS you want to stake and click stake.
NOTE: Staking means your funds are frozen in your account. If you would like to access some of your EOS without having to wait for the 72 hour unstaking period, simply leave some of your funds unstaked. This means that if someone hacks into your account, your unstaked funds will be vulnerable to theft, so only leave as many EOS unstaked as you are willing to lose.
 GIF Tutorial: Stake and Unstake your EOS for RAM/CPU/NET
HOW TO SET UP AN ACCOUNT ALERT
Now that you have a secure wallet, and you have staked the majority of your EOS, it is time to set up an account alert.
An account alert will notify you anytime any action occurs on your EOS account. For example, if your EOS are staked and you get an account alert that your EOS have been unstaked, you will know that someone is attempting to move your funds.
If you want to be updated on the latest transactions on your account, you can set up the Telegram Alert Bot by EOS Authority.
- Sign up for a Telegram account. Telegram is a decentralized chat system that most of the EOS community hangs out in.
- The Bot can be accessed here. The bot will walk you through the steps you need to take to set up your account alert. Please only use the EOS Authority bot, as there can be malicious bots that seek to steal your funds.
- If you have any questions about the bot, you can ask questions in the EOS Authority Telegram group.
HOW TO SET UP A MULTI-SIG ACCOUNT
So you have your secure wallet, you have staked your EOS, you've set up your bot, but you're still not feeling safe. Well, there's a solution for that!
Multi-signature permissions aka multi-sig. Multi-sig allows you to take your security to the next level by requiring more than one account to sign off on your transactions. Multi-sig is definitely more difficult than the other security options we have discussed, so make sure you sit down and focus when setting up your multi-sig options.
When you create a new EOS Account, you are usually provided with a single key for both owner and active permissions. These permissions are able to perform any kind of transactions. Therefore, the default configuration to authorize a transaction only requires a single signature (Single-Sig).
Example from developers.eos.io:
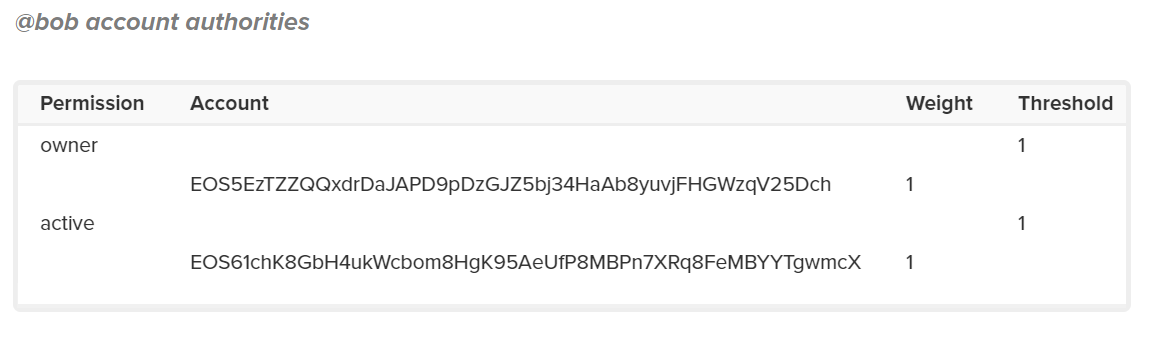
“In the @bob account example, this table shows that @bob‘s owner key has a permissioned weight of 1, and the required threshold to push a transaction under that authority is 1. To push a transaction under the owner authority, only @bob needs to sign the transaction with his owner key for the transaction to be eligible for validation. This key would be stored in a wallet.”
It is possible to customize the permissions of our account, creating new ones and setting up a Multi-Sig configuration.
Example from developers.eos.io:
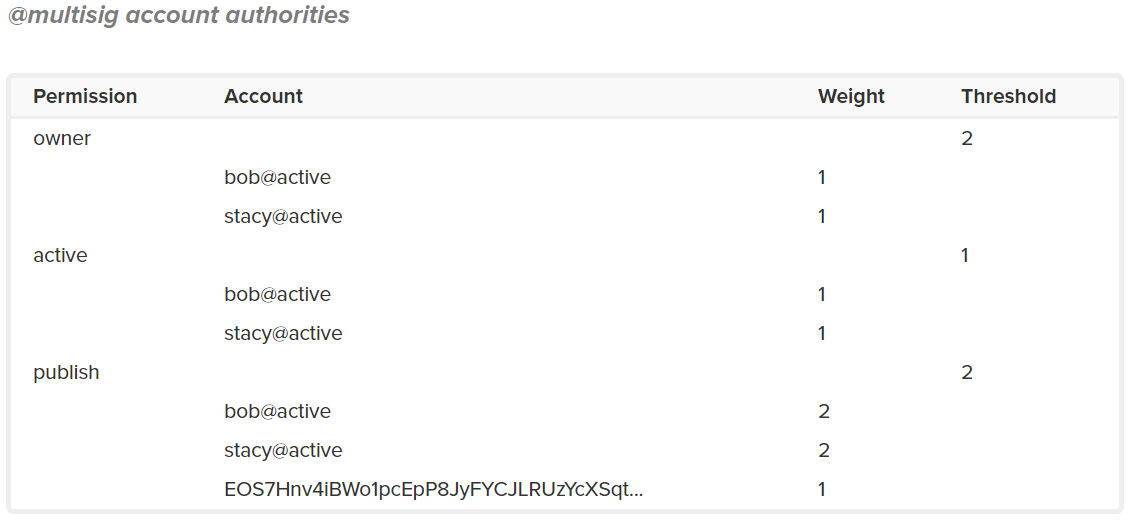
“In this scenario, a weight threshold of 2 is required to make changes to the owner permission level, which means that because all parties have a weight of 1, all users are required to sign the transaction for it to be fully authorized. To send a transaction which requires the active authority, the threshold is set to 1. This implies that only 1 signature is required authorize an action from the active authority of the account. There's also a third custom named permission called publish. For the sake of this example, the publish permission is used to publish posts to the @multisig's blog using a theoretical blog dApp. The publish permission has a threshold of 2, @bob and @stacy both have a weight of 2, and a public key has a weight of 1. This implies that both @bob and @stacy can publish without an additional signature, whereas the public key requires an additional signature in order for an action under the public permission to be authorized. Thus, the above permissions table implies that @bob and @stacy, as owners of the account, have elevated privileges similar to a moderator or editor. While this primitive example has limitations particularly with scalability and is not necessarily a good design, it does adequately demonstrate the flexible nature of the EOSIO permissions system. Also, notice in the above table, permissions are set using both an account name and a key. At first glance this may seem trivial, however it does suggest some added dimensions of flexibility.”
TAKE A BREAK, that was A LOT of reading.
Are you ready to continue? Okay. Now here are the instructions curtesy of our friends at GENEREOS, a trusted block producer on the EOS mainnet. They have done such a good job explaining how to set up a multi-signature account using eostoolkit.io that there is no need for us to recreate their instructions here. Read their article and come back to this article after.
ARE YOU BACK? HOW DID IT GO? If you still have questions, feel free to contact GENEREOS in their Telegram chat.
HOW TO SET UP PERSONALIZED PERMISSIONS So you’ve set up multi-sig permissions which is the best option to secure your EOS account, but it is still not user-friendly. When you use your account a lot and you need to authorize a considerable amount of transactions, for example if you use some dApps, authorizing every transactions with multi-sig could be bothersome. Therefore, there is ANOTHER step you can take to secure your account. It is possible to create a personalized, third custom named permission which you can allow to sign and authorize specified transactions.
For example, if I want to play EOSKnights from my smartphone, but I don’t want to insert the Private Key of my EOS Account onto my smartphone, I can create a new permission authorized only to play EOSKnights. That way, if my device is ever compromised and the private key of this new account stolen, the hacker will only be able to play EOSKnights and my funds will be secured!
At the moment, the only way to create a personalized permission is by using cleos or EOSToolKit.io. We will focus on using EOSToolkit.io.
How can I create a personalized permission to secure my EOS Account?
-
Browse to https://eostoolkit.io/. -
Attach the EOS Account where you want to create a new permission by using Scatter. -
Click on Manage Account > Advanced Permission -
Open Scatter and create a new EOS key pair. For more details check the previous guide “How can I create an EOS key pair?” -
Copy the EOS public key you have just generated and save the key pair. -
Go back to EOSToolKit.io and insert your data in the correct fields:
· Account: The EOS Account where you want to create a new permission · Threshold: 1 · Permission: The name of the permission you want to create, it can be anything, for example “iPhone” · Parent: Active · Authority: Paste the EOS public key you generated during step 4 and 5 · Weight: 1
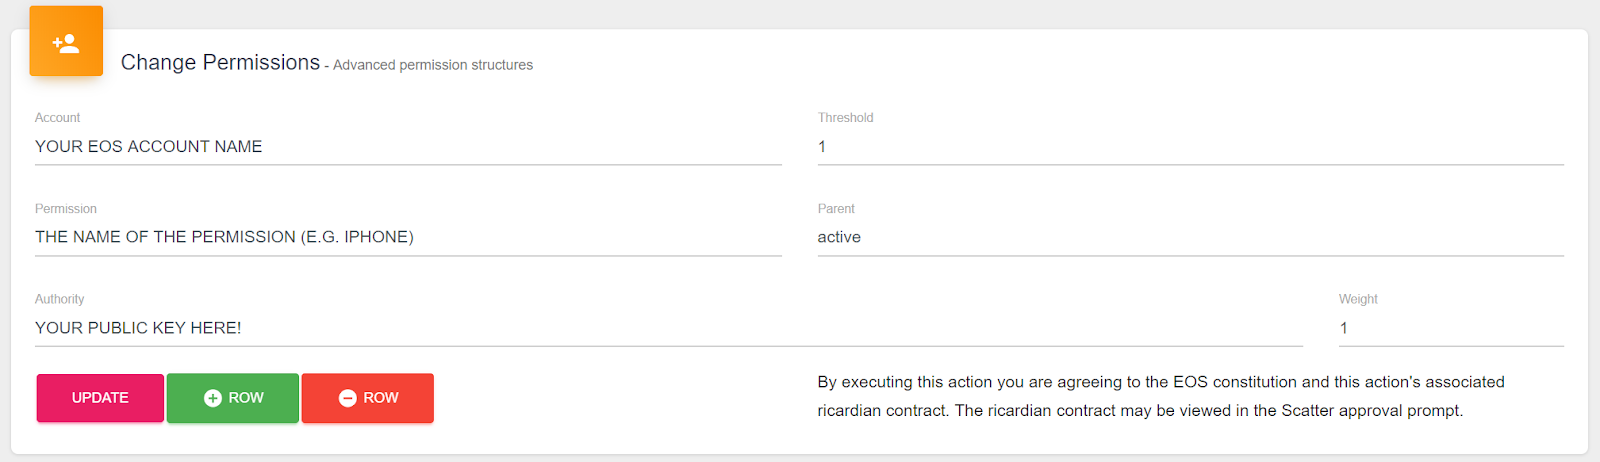
- Click “Update” and confirm the transaction. Now you have successfully created the new permission on your account! However, at the moment it is not authorized to do any transaction. So, you need to continue and authorize this new permission to sign the transactions that we need, in this case to play EOSKnights.
- Go back to EOSToolKit.io and click on Manage Account > Link Auth
- Insert your data in the correct fields: • Account Name: the EOS Account where you created the new permission • Account Permission: the name of the permission you want created during step 6 and 7 • Contract Name: the name of the contract to authorize, in this case, as we want to play EOSKnights, it should be “eosknightsio” • Contract Action: the name of the action to authorize, such as “rebirth2”
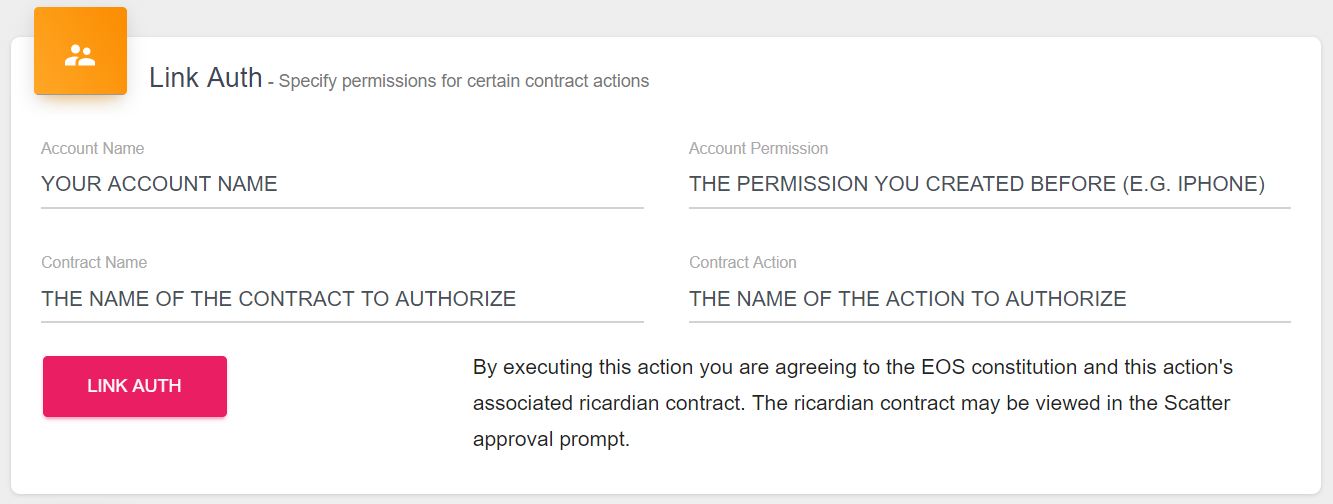
- Click “Link Auth” and confirm the transaction.
Done! You have successfully authorized your new permission to sign this specific transaction!
Remember that to play EOSKnights there are a lot of actions, such as “rebirth2”, “detach”, “craft”, “removeitem” etc. At the moment we only authorized this new permission to perform the rebirth2 action, if you want to authorize more actions, you will need to to the steps 9 and 10 more times.
For example, if you want to allow this new permission to stake your EOS, you will need to write on the · Contract Name field: eosio · Contract Action field: delegatebw If you need to find some particular Contract Name and the Contract Action you can search them on eoscharge.io
Now that you have set up this permission, you will just need to import the key pair onto your mobile wallet, or smartphone, or where ever you want to use this new permission.
HOW TO CHANGE COMPROMISED KEY PAIRS
You've done everything you can think of to secure your funds. You have the wallet, you've staked your EOS, you've set up a bot, and you've turned on multi-sig and personalized permissions. Frankly, you should be unhackable at this point, but, who knows? We live in a strange world. Some how, some way, your key pair has been compromised, and now you are at risk for having your funds stolen; what should you do??
If you think your account is compromised, you will need to change the permissions on your account.
To change your account permissions you need to have access to your account. You need to have the private key of the permission you want to change (active or owner).
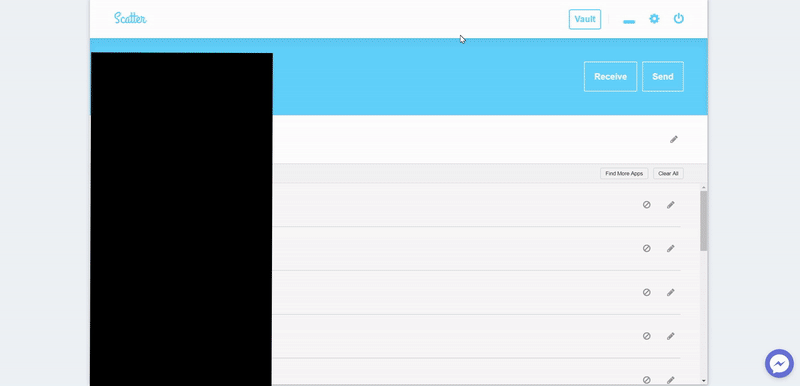
You can change permission by using Scatter + EOSX.io:
- Open Scatter Desktop The keypair that controls the account needs to be in Scatter, so if it is not imported you can follow the previous guide EOS BEGINNERS: Anatomy of an EOS Account and navigate to the Import Private Key in to Scatter section.
- Click on Vault > New > Create New. Scatter will now generate a new keypair which you can rename as you wish. For more details check the previous guide EOS BEGINNERS: Anatomy of an EOS Account and navigate to How to Create an EOS Key Pair.
- Copy the EOS public key that you have just generated.
- Browse to https://www.eosx.com/tools/permissions/update
- Click on “Attach Scatter Identity”
- Select the EOS Account you want to change the key pair to and select the permission you want to update (owner or active). Remember that the owner permission can be changed only by the owner account.
- Paste the public key on the permission field that you want to change (owner or active).
- Click on “Update AUTH”, confirm the transaction with Scatter and wait for the transaction to go live.
Done! You have successfully changed your key pair, and now your account is safe!
CONGRATULATIONS! You have completed our EOS BEGINNERS: Account Security Best Practices. If you have any questions be sure to ask us in the comments, or join our Telegram community to get customer support.
EOS GO is powered by YOU. Join the community and begin contributing to the movement by adding eos go to your name and joining the EOS GO telegram group.